Tag: Dynamics NAV

  • Reading Data from AL Table Extension Fields in Dynamics NAV/Business Central C/AL

    Reading Data from AL Table Extension Fields in Dynamics NAV/Business Central C/AL

    It is quite common these days to work in an environment that combines both C/AL and AL programming languages. However, with the release of Business Central 15, the mixed environment and C/SIDE environment are considered obsolete. If you are a NAV/BC developer working with versions that deal with codebases that use both C/AL and AL, you may encounter problems reading values from a table extension field. In such a scenario, this blog could prove to be useful.

    To begin with, I assume the readers are aware of the concept of table extensions. This object type helps us to extend the schema and a few properties of a standard table provided by NAV / Business Central, depending on the version you are in.

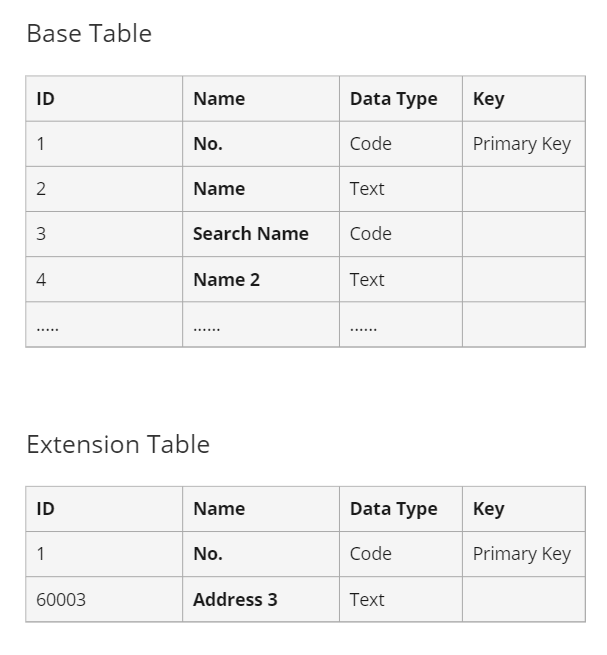
    With each table extension object, a new SQL table is generated using the “Companion Tables” concept. This new table is linked to the original table using the same primary key fields and includes fields added by the extension object. As a result, the more table extension objects associated with a table, the more SQL companion tables are created. Stefano Demiliani has pointed out the potential impact of increasing table extensions in his blog, but we will not delve into that here.

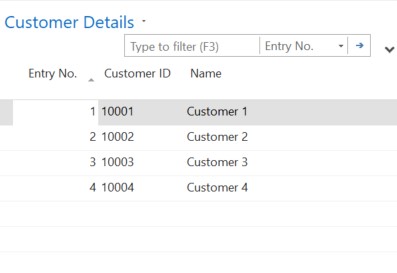
    Although the new fields added via table extensions can be included on pages where the parent table is the source and filtered, they are not visible in the C/SIDE environment. They cannot be accessed using the parent’s record variable. To address this issue, let’s look at a simple example where a new field is added to the Customer table using a table extension object, and the changes are published to the environment.

    #tableextension #dynamicsNAV #businesscentral
    Image : New field “Address 3” is added to Customer table with tableextension

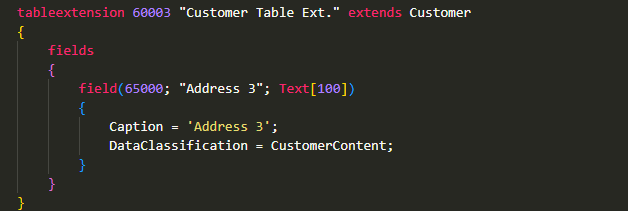
    This field is not visible to the users unless I add it to any existing pages where the source table is Customer.

    Image : Data Structure of Base and Extension Table

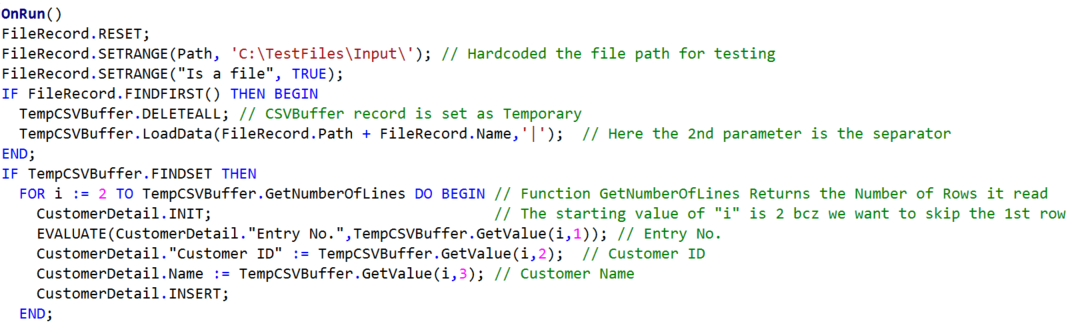
    Now, in order to call this field in C/SIDE and read the value stored in it, I created a generic function which asks 2 parameters, <Customer No.> and <Field No.> (Field in extension) and returns the value stored in it.
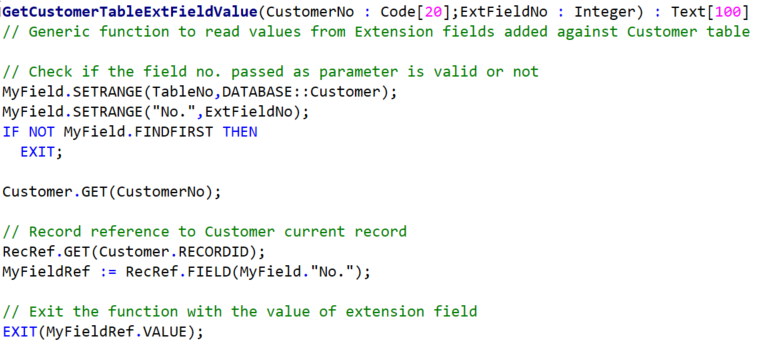
    #tableextension #dynamicsNAV #businesscentral
    Image : Generic function which reads value of extended field of specific customer record

    Here,
    MyField is a record variable of table Field
    RecRef is a RecordReference and MyFieldRef is a FieldReference variable, respectively.

    Be mindful when dealing with multiple extensions of the same table, it can become difficult to access the new fields in the C/SIDE environment at times and also with this approach, we cannot apply filters on extended fields as well.

    I hope you found this concept interesting and this blog useful, if yes, please try it out and leave your thoughts in the comments section below.

  • Replace XMLPorts with CSVBuffer to read large files with Multiple Columns

    Hello Everyone,

    Normally, we use XMLPorts, a traditional way to read data from any file into the NAV or Business Central database. Sometimes we need to spend a long hour to design the XMLPorts if the data we are importing is complex or includes many validations or with many columns included (Ex. –  a file with 400 Columns).

    Recently, while working on one of the Integration functionalities as an extension, I came across a similar situation and this time I found a much better way to deal with such case without spending much time on the design.

    Let me give you all a heads up of the case before I explain how I dealt with it. For my customization, I had to read data from a File with 420 Columns inside though I had to read the values of only 20 columns from it, which were not in order. The last 2 columns which I had to read were in index 337 and 340, so I was going with the XMLPort then, I had to create at least 340 columns in it and additionally needed to write some validations as the expectation was to skip the 1st row of the file, while reading it and also with a Custom field separator (“|”).

    Then  I found a way to make use of the CSVBuffer table which can import the data from any readable file with any file extension (.txt,.csv,.xls), with any defined Separator and also have a built-in function to read the values for a particular index.
    1

    As we can see that the table has only 3 Fields in it, where the 1st 2 fields are the part of Primary key and are responsible for creating the index, while the 3rd field is keeping the column value from the file.

    For an example designed a file with 3 columns and with a separator “|”
    2

    in this file, the 1st row comes with the Column Caption, so while importing the value, we need to skip the 1st row.
    3

    We’ll import the values finally into this table.

    Code

    I designed a Codeunit to process the file and took the CSVBuffer Record as Temporary. As we can see the CSVBuffer is having a Built-in function (GetValue) to read the values for index. Where we need to pass the Row Number as a 1st Parameter and the Column as 2nd.

    As we executed the Codeunit, it read the file from the defined folder and processed the data into the target table
    5
    Though my example was with only 3 columns and 4 rows, we can use this trick for reading the large files to save our development time and ease the process.

    Hope you find the details useful !!

  • Calling Page Actions through API

    Hello Everyone,
    In this blog, we’re going to get the concept of, how can we call a Page Action through API.

    As an example, I’m taking the Action: Release, from Sales Invoice Page, to elaborate on the development, step by step.

    Blog 1

    Consider that we already have a Page of type API, available to show the details of “Sales Invoice” (for reference, consider the Page: 5475 – Sales Invoice Entity). So now we wish to make the Action: Release available to call through the API request.

    1. Open the API page, 5475, add a new function – Release under the API page:
    Blog 2

    2. Change the default properties of the function to make it available for the API:
    i. Set the Property: Local to No.
    ii. FunctionVisibility to External.
    iii. ServiceEnabled to Yes.
    3. Add the below mentioned DotNet parameter to process the runtime action context:

    Var Name Data
    Type
    Subtype
    Yes ActionContext DotNet Microsoft.Dynamics.Nav.Runtime.WebServiceActionContext.’Microsoft.Dynamics.Nav.Ncl, Version=13.0.0.0, Culture=neutral, PublicKeyToken=31bf3856ad364e35′

    4. Add the coding under the function, involved in performing the action:
    Blog 3
    5. Once all these are done, go to the Postman to process the API Requests.
    For better reference and understanding, I’m documenting the process in a detailed stepwise manner.

    Step – A.  Create new API to GET the information of the Sales Invoice, you wish to Release.Blog 4
    You may get a specific Sales Invoice Document by applying the filters as highlighted above.

    Step – B.  Copy the id Value from here as id is set as the ODataKeyFields for thresalesInvoices APIBlog 5
    So, in order to call the particular record, you must pass the id field’s value as a parameter, in the API Request.
    Step – C. Create a POST Action to perform the action, as below :
    Blog 6
    In order to call the API Function to use the syntax: Microsoft.NAV.<Function Name>
    Normally, calling the API function will not return any response, so if the Status is 200 OK, then you understand that the Function got executed successfully.

    Step – D. Go to the Sales Invoice and see if the Status of the Sales Invoice got changed or not.
    Blog 7

    We can see that the Status got changed to Released.

    I hope you found this blog useful and can use the information in your development. Thank you for your time. See you soon with a new blog.

  • Reading data through API request – Dynamics 365 Business Central

    Hello Everyone,
    In my previous blog, I have listed down the steps on how to enable the API services for Dynamics 365 Business Central. In case you missed the blog, you may go it through here.
    So, in this blog, we’re going to create the first API in D365 BC to read the data from the Item Table.

    Before we dive into the development, I wish to share some best practices of API design, which we need to keep in our mind whenever we choose APIs as an option to perform any work.

    1. API Naming – URL Name, API Node name

    • Always start with a small letter
    • EntityName will always start with the source table name

    Example: API for item journal line: itemJournalLine

    • EntitySetName will always start with source table name + ‘s’

    Example: API for item journal line: itemJournalLines

    • API Node name will always follow the field name.

    Example: “Item No.” becomes itemNumber and “No.” becomes number.

    1. 1 Table only 1 API
    • Try not to create multiple APIs to perform different operations on a single table. It might create confusion as well as, conflicts of the entity names. So always try to make it simple and reuse the API already created for a table.


    1. Try to avoid the below-mentioned things to get proper response from the API
    • Predefine filter
    • Condition output
    • Error Handling

    Ok, so let’s move to the API designing part now. Creating a new Page with Type: API and Source Table: Item.

    21

    So now the page design is ready with 3 fields in it :
    22

    Next, let’s go to the Properties and make the necessary changes.
    23

    Basically, these are the properties we need to look into, so I’m coming to each of these ones by one :

    EntityName and EntitySetName: These are the identification parameters of an API, so whenever we assign the names we need to be careful.

    InsertAllowed, ModifyAllowed, and DeleteAllowed – I set all these to No as for this API we’re not going to make any Record level changes, but our main intention is to read the records from the table. So better to set these as No.

    ODataKeyFields – Basically this is the Key based on what we can get the data. It’s not mandatory if the ODataKey is same as the Source Table Primary Key, but it’s good to make it a practice to assign. We can define a set of fields also as a key for our API.

    Next is the Field naming.

    24

    I practice, the field naming in an aforesaid way, but if you wish you can skip this part too.

    25
    Identify your Entity name from the published API list and also get the company ID of the company you wish to retrieve the data from.
    26

    Copy the Company ID as highlighted.
    Then Let’s go to the API Request part. So, to process the API requests I’m using an agent called Google Postman, it’s a freeware, so you can download it and make use of the same.
    27

    So, here you get the data from the Item Table using the API Request. The method we are using is GET, as we are reading the table data through this request.
    If you wish can apply filters also while sending the request, like this :
    28

    I’ll elaborate on the application of filters in the API Requests in another blog soon. Hope you found this blog useful.

    Thank you for your time. See soon with another blog.

  • Kickstart with MS Dynamics 365 Business Central

    Hello Everyone,
    As we are evolving day by day, so are our technologies. Microsoft has introduced the newest member of their Dynamics family, who can be named as a successor of products like, Microsoft Dynamics NAV, Microsoft Dynamics GP or Microsoft Dynamics SL. Microsoft Dynamics 365 Business Central shares the same Codebase as Microsoft Dynamics NAV, though the programming language it uses is not C/AL anymore, it got replaced with a new language called, AL (Application Language).

    business-central-user-interface.jpg
    fig: Role Center page of Business Central 

    This product is available in both Web-Based (Following SAAS – Software as a service model ) and On-Premise (with Role Tailored Client) versions and with three different licensing types : Essential (Includes all except service management and manufacturing), Premium (Includes all Modules) and Team Members (Reads and approves, creates cards, quotes, and sales orders). Business Central is based on “Named User” concept, means each user requires a separate user license to operate.

    All the developments in Business Central are Extension Based (Supports both V1 and V2) and are done in the VSCode (Visual Studio Code) development window. Other than the existing object types (Table, Page, Report, Codeunit, XMLPort, Query) AL came up with 2 new Object types Table Extension and Page Extension while some of the existing properties like CaptionML, ShowMandatory got obsoleted in this version.

    Though the VSCode environment is nowhere similar to the C/SIDE, it’s simple yet powerful with features like IntelliSense, Cross-Referencing, Code Snippets and many more.

    I’ll try to share more details on Business Central in my upcoming posts. Thanks for reading.